Showing posts with label favorite tools. Show all posts

Sunday, January 13, 2013

Lucky 13's - treasures found

Happy January 13! Thinking of luck and one of my favorite quotes "no fate but what we make", why not have 13's be lucky?

So far in 2013, I've been lucky enough to find 2 of my favorite tools that were lost!  They were hanging out together in a crossstitch kit, that obviously I had not been working on recently.

Funny these two tools had a few things in common that I wouldn't have thought of if they weren't found together.  Both came from "Falls", Omstead Falls and Great Falls, both from really unique quilt shops, and both were splurges.  If you ever have the chance to visit Abigayale's Quiltery in Omstead Falls, Ohio or Jinny Beyer's in Great Falls, Virginia, enjoy the adventure!

Several years ago traveling to Cleveland area for work, I happened to find Abigayle's.  I was in sewing withdrawal and the ladies working there were beyond friendly and welcoming.  I started up a handsewing project so I could sew on the go, and picked up my Roxanne open ended thimble - it allows you to have a longer nail and the thimble stays right where it should on the pad of the finger.  Abigayle's in is an old Victorian house, each room held different treasures: a room for the threads, another for novelty prints, then the flannels, etc.  In one of the upstairs rooms I found scraps by the ounce - a giant barrel of scraps, you pick out the ones you want and they get weighed at the checkout - kinda fun to dig thru a barrel of scraps!

Jinny Beyer's shop did not involve any digging thru barrels!  Jinny's shop has a museum quality to it, there is an awe I experience in seeing the precision and handwork of her quilts.  There is a genuine beautifulness to the display cases of the handsewing tools (including a pair of Dovo folding scissors, that came home with me).  I love the colors of the Palette Collection, and of course the border prints!  I went to Jinny's with a few of my quilt bee-mates, made a day of the adventure including lunch.  Food, friends and fabric: key ingredients in a fun adventure.

I love these two tools, not just cause they are great tools, but together they have remind me of these adventures - one I experienced alone and the other with friends.  Now having found them together, it adds to their history.  So I'm saying it aloud,  "I'm lucky to have misplaced them!"  It allowed me remember these stories and share them with you!  Plus, these tools came back to me at a time, when I am ready to spend more time on my handwork. 

Gotta say that was lucky!


Sunday, July 22, 2012

Unravelling the Lace

Come along on a design journey with me!
A glimpse into my creative process for my Arts and Old Lace Challenge...

Once the challenge was issued at the Power Suit Reveal, I started humming or outright singing "Chantilly Lace", by the Big Bopper, J.P. Richardson, I thought it was too silly a song to be an inspiration. I pondered and sketched out a closeup of a rose; roses go with both Arts and Old Lace. But the song kept playing and I decided I better give in to this inspiration,
you just can't always pick what inspires you.  
Images such as the one on http://www.officialbigbopper.com/ 
show a guitar (a great circle, some nice curves and straight lines)
behold my design inspiration.

...by the way, the lace I used is not "chantilly lace", chantilly lace is actually a very delicate fine lace, whereas this lace is quite thick and may be chemical lace.  Check out http://lace.lacefairy.com/Lace/ID/laceID.htm 
what do you think?

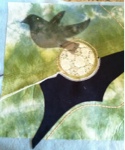
I was lucky enough to spend Memorial Day weekend at a good friend's house.  I packed up all my possible supplies for this project  - in fact this first image shows where I started the weekend..  I made this handdyed, by mixing green and blue; I added a circle for the sound chamber with one of the laces in my kit, and used a nice blue Ultrasuede for the pick guard.  Music give us wings so I added a bird.
 
But the bird didn't add to the overall feel I wanted- so bye bye birdie!
I like the curve of the double pico trim - it's kinda rockabilly...
 
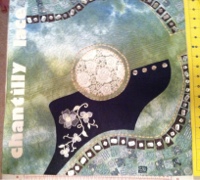
So I say let's go crazy with the rockabilly.... and I added the words "chantilly lace", just in case, and a pony tail hanging down, oh baby you know what I like.  This project has me breaking into song way too much.  I blame (or credit)  Judy Gula and Cyndi Souder for this frivolity, that I am so enjoying!

I love all Ultrasuede but uh-oh noticed this cream Ultrasuede was starting to unravel with a light touch and this quilt needs to travel . 
So I somehow need to cover it...
let me try this sheer blue ribbon...

  
Okay, that was too crazy, even for me!  I lost the feeling of the guitar, but love the loops of rick rack (save idea for future fun)  
The blue ribbon adds a line that is ok, but not great.  
Let's take some more stuff off and add some buttons
  
Hmm, better, but what's up with the double pico trim ? looks weird...
Added strings - maybe to couch down - plus used the frog as the "bridge" 
I'm learning guitar terminology!

Those strings don't add to the guitar as much as an over all outline of the guitar would do... My friend had left overs of brown and blues of a mosaic project so I used those for the outline and background - plus I put a cream colored tulle over the whole thing - it tones down the blue pick guard and keeps the words from unraveling. 
I fused down the outline shape mosaics - I'm committing to it!

Next, I laid out some funky rectangle buttons to "tone down" the "brown" (hope my rhymes don't make you frown!)  
Used 4 buttons to represent the tuning pegs.


 Tried the curve of buttons along bottom again... and the strings...
  
 I think it needs to be simpler...

  
Tested out the rectangle buttons as if the pickguard got the measles - interesting, but not adding to the feel of a rockabilly guitar
 
Nah that's doesn't add to the guitarousity of it... 
Those buttons need to be on the brown squares, both to tone down the brown and add a little sparkly shape element

Trying the curve of buttons again on the pick guard....

Nope, I like the right side of the blue to be a clean stark edge.  
I love the frog trim, I want to use it.

The frog cannot stay there, moved it below.
Added the 4 buttons in the top spot.

  
Hmm, don't know why, but I must kiss this frog goodbye...


Voila,that's how I came up with this design.


FYI, I used a facing edge - my favorite edge, I hand stitched the buttons after the facing edge was complete.  I also tacked down the floral trim with a few hand stitches, since the quilt (I'm hoping!) will be on tour for quite a while!  The only elements that are "above the tulle" are the floral trim on the pickguard and all the buttons.


I really enjoyed the process of this design, 
thanks for coming along on this journey with me. 


Design Tool -  the digital camera.

I find the camera on the iphone to be very helpful in the design process.  Any digital camera will let you audition and flip between options. Most of the conversation here was played out as I would keep looking back at the phone and analysing the photos.

Bonus Two-fer -
The camera is also a great Memory Tool - capturing inspiring images, great ideas, someone's contact info (snap a photo of the business card, I can type it into a digital phone book later), take a photo a fully used white board so I don't lose the info, but can erase and have a nice blank space to scribble again, photos of steps in a complicated process (that I might not remember in 2 months), or  the cover of a book I want to order.  In fact I even use my phone camera to remember where I parked my car in a parking garage.  True story - when my sis was in the hospital (I was exhausted, I worked a full day- then was heading to the hospital to relieve my mom and be the overnight shift).  I knew the next morning I would have no clue where I parked, so I stood in front of the elevator (turned around so I would have the same view as when I emerge the next day) and just pointed the camera in direction of my car, typically there are numbers/letters or colors on poles/posts/walls and those will show up on your photo - remember, the cars are likely to change, but the building will still be the same! 


Thursday, July 12, 2012

Contrast and Commonality


In Quilt University's Playing with Paint online class with Lyric Kinard  I've been having a lot of fun and learning some good painting techniques. The painting on silk reminded me of a book, that I saw once.


I use my phone camera as a memory tool, so I looked in my photo album to remember...

On Reveal Day 12 I wrote "But is there some contrast and commonality I ask?".Reading Kees van Aalst's blog for July 1st, I see the terms cohesion and variation while discussing color and the need to have some balance.


Some of the fun I had painting thru the Playing with Paint included, learning that the back of what I'm working might be more interesting than the front.  Here I loaded the brush with multiple colors ala Donna Dewberry's One Stroke painting.

reverse
front

Plus if you don't like something... add more paint.
I like step 2's sponge painting addition to the mix.

step 1
step 2


Somethings you need to take with a little grain of Sodium Chloride. 


wet color wash

wet color wash with salt

It's fun to play with your food!


thanks for having fun with me today!


Monday, June 18, 2012

Bloom - Reveal Day 7


I love my flower cogs (flogs), I find these to be a happy shape. I love when Art makes me happy!  Many happy mornings were spent watching Bob Ross painting happy clouds.  Again I diverge, but wait, isn't divergence part of the journey?  So I take this moment to thank those who came before and inspired me and taught me I can be myself and I can be silly, you don't need to be what others think is a serious mopey artist to be making art, seriously! 
  • Flogs cut from Artfabrik handdyes (leftovers from class with Laura Wasilowski last year) - circles drawn with Staedtler Halfpipe Pen Style Compass, circles cut and wedges cut out
  • Free cut stems on the bias
  • McTavishing Free Motion Machine quilted the background first then applique stitched since I wanted to overlap the applique over the quilting
  • Orange Flogs appliqued with a tighter freemotion zigzag
  • Red/Yellow Flogs appliqued with a free motion zigzag keeping the quilt oriented the same way no mater where on the flower I am, then turning quilt 90degrees and repeating
  • Hand sewed french knots in each flower - using DMC variegated floss (90, 106 and 51) - the Yellow Flogs have strands 90 and one each of 106 and 51, Orange has 2 strands 51, one each of others...  For the 2 strands that are the same floss, turned one so that the result is a more mottled look of color rather than the distinct color variations.


The birth of "Flog"...
Once upon a time in a challenge project long long ago, a tiny artist wanted to show the inner workings of her mind, so a cog or gear shape was in order.  She cut out a circle that was too static and round - so cut some wedge shapes out of it, kinda free and kinda messy like.  The cog was born, and all was good, but the cog looked kinda like a flower, and the tiny artist called it a "Flower Cog" for a while, but that is too long a name, so Flog it is!   I was pleased to find that Flog is an acronym: "For Love of God". Found that on Wikipedia, for the love of God!