Showing posts with label circles. Show all posts

Wednesday, August 22, 2012

Cheryendipity

When you are lucky, you get just what you need, just when you need it.

Most of the time that's called Serendipity.

When I started the day, I wasn't feeling very creative or inspired, but then I heard Cheryl Lynch's talk "Inspiration From Squiggles and Dots". 

One of the photos in her slideshow was from Longwood Gardens - and I recognized the shape it was something I had taken a photo of last year...

here is my photo...
some of Cheryl's small pieces
Longwood Gardens artful manhole cover


why is it the funner photos are more blurred?  Fun has a blurring effect!


another interesting shape at Longwood Gardens


why did this shape appeal to me? see my feet?
 

Sunday, July 22, 2012

Unravelling the Lace

Come along on a design journey with me!
A glimpse into my creative process for my Arts and Old Lace Challenge...

Once the challenge was issued at the Power Suit Reveal, I started humming or outright singing "Chantilly Lace", by the Big Bopper, J.P. Richardson, I thought it was too silly a song to be an inspiration. I pondered and sketched out a closeup of a rose; roses go with both Arts and Old Lace. But the song kept playing and I decided I better give in to this inspiration,
you just can't always pick what inspires you.  
Images such as the one on http://www.officialbigbopper.com/ 
show a guitar (a great circle, some nice curves and straight lines)
behold my design inspiration.

...by the way, the lace I used is not "chantilly lace", chantilly lace is actually a very delicate fine lace, whereas this lace is quite thick and may be chemical lace.  Check out http://lace.lacefairy.com/Lace/ID/laceID.htm 
what do you think?

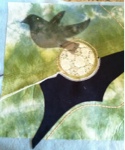
I was lucky enough to spend Memorial Day weekend at a good friend's house.  I packed up all my possible supplies for this project  - in fact this first image shows where I started the weekend..  I made this handdyed, by mixing green and blue; I added a circle for the sound chamber with one of the laces in my kit, and used a nice blue Ultrasuede for the pick guard.  Music give us wings so I added a bird.
 
But the bird didn't add to the overall feel I wanted- so bye bye birdie!
I like the curve of the double pico trim - it's kinda rockabilly...
 
So I say let's go crazy with the rockabilly.... and I added the words "chantilly lace", just in case, and a pony tail hanging down, oh baby you know what I like.  This project has me breaking into song way too much.  I blame (or credit)  Judy Gula and Cyndi Souder for this frivolity, that I am so enjoying!

I love all Ultrasuede but uh-oh noticed this cream Ultrasuede was starting to unravel with a light touch and this quilt needs to travel . 
So I somehow need to cover it...
let me try this sheer blue ribbon...

  
Okay, that was too crazy, even for me!  I lost the feeling of the guitar, but love the loops of rick rack (save idea for future fun)  
The blue ribbon adds a line that is ok, but not great.  
Let's take some more stuff off and add some buttons
  
Hmm, better, but what's up with the double pico trim ? looks weird...
Added strings - maybe to couch down - plus used the frog as the "bridge" 
I'm learning guitar terminology!

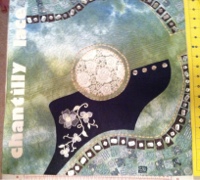
Those strings don't add to the guitar as much as an over all outline of the guitar would do... My friend had left overs of brown and blues of a mosaic project so I used those for the outline and background - plus I put a cream colored tulle over the whole thing - it tones down the blue pick guard and keeps the words from unraveling. 
I fused down the outline shape mosaics - I'm committing to it!

Next, I laid out some funky rectangle buttons to "tone down" the "brown" (hope my rhymes don't make you frown!)  
Used 4 buttons to represent the tuning pegs.


 Tried the curve of buttons along bottom again... and the strings...
  
 I think it needs to be simpler...

  
Tested out the rectangle buttons as if the pickguard got the measles - interesting, but not adding to the feel of a rockabilly guitar
 
Nah that's doesn't add to the guitarousity of it... 
Those buttons need to be on the brown squares, both to tone down the brown and add a little sparkly shape element

Trying the curve of buttons again on the pick guard....

Nope, I like the right side of the blue to be a clean stark edge.  
I love the frog trim, I want to use it.

The frog cannot stay there, moved it below.
Added the 4 buttons in the top spot.

  
Hmm, don't know why, but I must kiss this frog goodbye...


Voila,that's how I came up with this design.


FYI, I used a facing edge - my favorite edge, I hand stitched the buttons after the facing edge was complete.  I also tacked down the floral trim with a few hand stitches, since the quilt (I'm hoping!) will be on tour for quite a while!  The only elements that are "above the tulle" are the floral trim on the pickguard and all the buttons.


I really enjoyed the process of this design, 
thanks for coming along on this journey with me. 


Design Tool -  the digital camera.

I find the camera on the iphone to be very helpful in the design process.  Any digital camera will let you audition and flip between options. Most of the conversation here was played out as I would keep looking back at the phone and analysing the photos.

Bonus Two-fer -
The camera is also a great Memory Tool - capturing inspiring images, great ideas, someone's contact info (snap a photo of the business card, I can type it into a digital phone book later), take a photo a fully used white board so I don't lose the info, but can erase and have a nice blank space to scribble again, photos of steps in a complicated process (that I might not remember in 2 months), or  the cover of a book I want to order.  In fact I even use my phone camera to remember where I parked my car in a parking garage.  True story - when my sis was in the hospital (I was exhausted, I worked a full day- then was heading to the hospital to relieve my mom and be the overnight shift).  I knew the next morning I would have no clue where I parked, so I stood in front of the elevator (turned around so I would have the same view as when I emerge the next day) and just pointed the camera in direction of my car, typically there are numbers/letters or colors on poles/posts/walls and those will show up on your photo - remember, the cars are likely to change, but the building will still be the same! 


Chantilly Lace Reveal


Artist statement
Chantilly Lace – Amy Parra Morusiewicz
My guitar shaped piece honors the memory of J. P. Richardson (the Big Bopper), his lighthearted music is like art to my ears. This rockabilly tune from 1958, plays in my head with new lyrics: “Chantilly Lace in an Eighteen Inch space, with a deadline hanging down, that inspired my art, with a giggle in my heart, fun makes the world go round, oh baby, that’s what I like.”  Humor and art can coexist.  My muse is to a-muse.  Visit my blog for more details on my arts and adventures: funfromatoz.blogspot.com.    I wish you Fun From A to Z!

 Cyndi Souder, Judy Gula and me at the artists reception

Tomorrow, I'll give you a glimpse into my creative process and share one of my favorite design tools.

Thursday, June 21, 2012

Boone Moon - Reveal Day 10


  • Gelatin Plate printed the negative of a fern with light green metallic paint on Paprika kona (great name for a spicy color)*!!!
  • I looked around sewing studio for suitable background fabric - auditioned a few, then boom boom boom like the moon moon moon, I looked over on the back of my sewing chair I had draped this fabric print that I bought - well I copied my friend Linda Boone who had just bought the same fabric about 10 seconds before me - and it was exactly right.  Sometimes the right solution is easy and right in front of you (or in my case, draped on the chair behind me) and all you need to do is be open to it.
  • Free Motion ZigZagged applique on using multiple passes
  • Quilted in the stem
  • Free Motion Machine quilted the background fabric using the movement in the colors to maneuver the quilting stitches


  * - These steps were done prior to 12x12x12 challenge
!!! - First time I ever did this type of thing


Probably I would have tried to match the Paprika color for the stem stitches but out of pure laziness I did not change the blue thread on machine from Day 9 quilt - and I like the effect I got by adding the color to the stem. Luck of the Laze!

Tuesday, June 19, 2012

Dragon - Reveal Day 8


 Based on a sketch from spring 2011


  • Fused background fabric to Freezer paper for stability
  • Wavy S shape drawn with Sewline Air Erasable pen
  • Circles drawn along the line using the Staedtler Professional Combo Circle template
  • Colored in the spheres with Tsukineko Inks blending rainbow colors and adding some spherical shapes
  • Accidentally used steam when setting the inks, and got a nice smeary effect on the red to oranges and teals (interesting effect - may need to try on purpose) !!!   

  • Free Motion Machine quilted around spheres first
  • Quilted lines moving top to bottom around the spheres!!! and echoing curves on upper right
  • Added a dragon scale (or fern-like) quilting in areas that needed tighter quilting !!!
  • Did a vertical stitching below dragon echoing the tail - I like the checkerboard effect it gives.  I don't know if I like the quilting inside the dragon tail...
  • Bound using chunks of fused fabrics, fused on front and wrapped to the back!!!
Fun to take an idea from the sketchbook to the quilt.  This was just a shape (not a dragon) til I took one look at it from a different angle, turned it upside down and voila - dragon.  After it was quilted, I really  liked this quilt - but then when I bound it I feel that it came to life in a whole new way- now I love it, it's one of my favorites.


  * - These steps were done prior to 12x12x12 challenge
!!! - First time I ever did this type of thing


pizza cheese fabric


and I end this post with the cheese fabric on the back
why you ask?
because we all know "the cheese stands alone"!

Monday, June 18, 2012

Bloom - Reveal Day 7


I love my flower cogs (flogs), I find these to be a happy shape. I love when Art makes me happy!  Many happy mornings were spent watching Bob Ross painting happy clouds.  Again I diverge, but wait, isn't divergence part of the journey?  So I take this moment to thank those who came before and inspired me and taught me I can be myself and I can be silly, you don't need to be what others think is a serious mopey artist to be making art, seriously! 
  • Flogs cut from Artfabrik handdyes (leftovers from class with Laura Wasilowski last year) - circles drawn with Staedtler Halfpipe Pen Style Compass, circles cut and wedges cut out
  • Free cut stems on the bias
  • McTavishing Free Motion Machine quilted the background first then applique stitched since I wanted to overlap the applique over the quilting
  • Orange Flogs appliqued with a tighter freemotion zigzag
  • Red/Yellow Flogs appliqued with a free motion zigzag keeping the quilt oriented the same way no mater where on the flower I am, then turning quilt 90degrees and repeating
  • Hand sewed french knots in each flower - using DMC variegated floss (90, 106 and 51) - the Yellow Flogs have strands 90 and one each of 106 and 51, Orange has 2 strands 51, one each of others...  For the 2 strands that are the same floss, turned one so that the result is a more mottled look of color rather than the distinct color variations.


The birth of "Flog"...
Once upon a time in a challenge project long long ago, a tiny artist wanted to show the inner workings of her mind, so a cog or gear shape was in order.  She cut out a circle that was too static and round - so cut some wedge shapes out of it, kinda free and kinda messy like.  The cog was born, and all was good, but the cog looked kinda like a flower, and the tiny artist called it a "Flower Cog" for a while, but that is too long a name, so Flog it is!   I was pleased to find that Flog is an acronym: "For Love of God". Found that on Wikipedia, for the love of God!

Friday, November 11, 2011

Numbers Count

Happy Triple 11's today! 

Wednesday was reveal day for the 2011 challenge quilts.  Challenge was to make a quilt inspired by page 73 of a nonquilting, nonart magazine.  I checked about 73 different magazines before selecting my page 73.

Peaceful Passage
Yes, I've come full circle back around to circles!

I had fun with numbers, such as the olive branch is made up of 7 leaves, 3 of which have stems.  There are 3 blue flower-cogs (flogs, cowers?), 3 sides of quilt have facing that takes the silk right to the edge.  There are 3 double flogs, and 7 single black/grey flog shapes, 3 silver circles.  Love the juxtaposition of wool felt and silk - the only cotton is a single green line on the left edge. In Cognition (my Power Suit entry) I didn't want to admit the shape could be a flower so I denied it's graphic daisy-osity;  with Peaceful Passage, I embrace it's inner flower and gave them a little spin.


Here's my inspiration page...


I wanted to put number 73 in the quilt, but slightly hidden... do you see it now?

Serendipitously...
Saint Leigh and her son spread their wings and carried me as we embarked on a quest from to silver water  to the land of rocks to rescue my silver stallion from it's incarceration.  Yes, you guessed it my car was towed from Silver Spring to Rockville...  Leigh's sister is a great friend, Nickie (or five-cent as some of us hockey players know her), so I know one day through Nickie, our paths would have crossed, but if not for the tow I wouldn't have been inspired to add the peaceful dove and olive branch, so I guess I should say that I must say I was lucky... And I do feel lucky, overall it was a positive experience. 

I wanted to honor their kindness in my art, with both the image of the peace dove and on the backing a delicious chocolate colored fabric.   Leigh Lambert is an experiment artist as well, now I crave to experience her art and I predict that I'll be trying these brownies in my not so distant future...

The hand dyed silk was a gift from my sister, so you need sisters for Peaceful Passage.  My sister also asked what is the Chinese character means - I think it's "peace", based on the Internet - but I don't read Chinese, so it could be "soup"...

Sorry for the humorous diversion - back to math...
So I thought I would count up the parts of the quilt not including the shadow silhouette, tada! There are 33 (oh yes I counted 3 times to be sure) 

33 is 11+11+11

what an auspicious number!


Sunday, May 8, 2011

contagious circle-ocity

I knew this circle-osity was getting interesting when I started getting photos and links from my friends.

 Sheila found these circles at a yoga studio


 Time and a circle - thanks to Karen T for the photo


Mary spotted this odd sculpture at Savage Mill - spheres and half a face...


Leonie sent me a link to Japanese manhole covers - I just love this one with lots of circles